Introduction to Homemade Twix Bars
When was the last time you savored a candy bar that made you feel like a kid again? Homemade Twix Bars are not just a treat; they’re a delightful journey back to nostalgia, all while offering the excitement of creating something special in your kitchen. Let’s explore why crafting these delicious chocolate-coated confections at home is worth your time.
Why Make Homemade Twix Bars?
-
Control Over Ingredients: One of the primary benefits of making your own Homemade Twix Bars is the ability to choose quality ingredients. You can opt for organic cocoa, real butter, and even substitute for traditional sugar with healthier alternatives like coconut sugar or agave syrup. Quality matters, especially when you’re indulging in a sweet treat!
-
Customization Opportunities: Have you ever wished you could tweak that recipe just a bit? Doing it yourself means the possibility to experiment with flavors. You could add a hint of sea salt to enhance the caramel’s flavor, or maybe a dash of espresso for a coffee twist. The choices are nearly endless! Check out Serious Eats for more ideas on creative adaptations.
-
Bonding Moments: Cooking isn’t just about the food; it’s about the experience. Invite a friend over or involve your partner in the process. Sharing the joys of preparing Homemade Twix Bars can create lasting memories. Plus, who wouldn’t enjoy a bit of friendly competition over whose bars are the best?
-
Perfect for Special Occasions: Whether it’s a birthday party, a holiday gathering, or just a cozy movie night, these bars can be a great addition to the snack table. Knowing you made them from scratch adds a personal touch that store-bought candies simply can’t match.
-
Mindful Treats: In today’s fast-paced world, it’s easy to forget the joy of savoring something homemade. Making your own Homemade Twix Bars means you can enjoy every bite, free from the guilt that often accompanies sugary store-bought snacks.
So, why not take a break from the usual and try your hand at these Homemade Twix Bars? They’re more than just candy; they’re a celebration of creativity, quality, and good times!

Ingredients for Homemade Twix Bars
Creating Homemade Twix Bars is a delightful journey that results in your very own version of these iconic treats. Let’s break down the essential ingredients you’ll need to craft all three delectable layers: the shortbread, the gooey caramel, and the rich chocolate coating.
Essential ingredients for the shortbread layer
For that perfect buttery crunch, gather the following:
- Unsalted butter: Ensures a rich flavor.
- Granulated sugar: Adds sweetness to balance the butter.
- All-purpose flour: The base of your shortbread.
- Salt: Just a pinch to enhance flavors.
These ingredients come together to create a melt-in-your-mouth texture that defines a Homemade Twix Bar.
Key ingredients for the caramel layer
A smooth, rich caramel layer is what makes these bars so irresistibly good. You’ll need:
- Brown sugar: For that deep, toasty sweetness.
- Sweetened condensed milk: Helps achieve that signature gooeyness.
- Light corn syrup: Adds texture and prevents crystallization.
- Butter: Essential for a velvety finish.
This layer is where the magic happens, transforming simple ingredients into a luscious delight.
Chocolaty goodness: What you need for the chocolate layer
The final touch is a rich chocolate coating to seal in all that goodness. Prepare with:
- Milk chocolate or dark chocolate: Choose your favorite for the perfect finish.
- Coconut oil (optional): Helps with melting and adds a lovely shine.
This chocolate layer not only provides a beautiful sheen but also completes the texture and taste profile of your Homemade Twix Bars.
Ready to indulge your sweet tooth? Let’s whip up this treat together! If you’re looking for more sweet inspirations, check out Epicurious or AllRecipes for tips and variations!
Step-by-Step Preparation of Homemade Twix Bars
Making your own version of Homemade Twix Bars is not only a fun project but also a delightful treat to savor and share. With a buttery shortbread layer, rich caramel, and a smooth chocolate coating, these bars are bound to impress everyone who tries them. Let’s dive into the steps to create this indulgent treat!
Gather and Prepare Your Ingredients
Before you start the oven, let’s make sure you have everything on hand! Here’s what you’ll need:
-
For the shortbread layer:
-
1 cup unsalted butter (softened)
-
1/2 cup powdered sugar
-
2 cups all-purpose flour
-
1/4 teaspoon salt
-
For the luscious caramel:
-
1 cup granulated sugar
-
1/4 cup unsalted butter
-
1/2 cup heavy cream
-
1/4 teaspoon salt
-
1 teaspoon vanilla extract
-
For the chocolate coating:
-
2 cups milk chocolate chips or chocolate bars
-
1 teaspoon coconut oil (optional, for sheen)
Once you’ve got your ingredients ready, preheat your oven to 350°F (175°C). This step is crucial to ensure your shortbread bakes uniformly. Check out this helpful guide on baking tips if you want to brush up on your technique before starting!
Create the Shortbread Layer
Now, let’s make that buttery shortbread layer that serves as a delicious foundation for your bars. In a mixing bowl, beat the softened butter and powdered sugar until light and fluffy, about 2-3 minutes. Then, gradually add the flour and salt, mixing until just combined.
- Tip: Overmixing can lead to tough cookies, so keep it gentle!
Next, spread the mixture into a greased 9×13 inch baking dish. Press it down firmly but evenly to avoid uneven baking. Bake for 20-25 minutes or until lightly golden. Once done, allow it to cool in the pan while you prepare the caramel.
Whip Up the Luscious Caramel
Ah, caramel—the star of the show! In a saucepan, start by melting the sugar over medium heat, stirring constantly. This process requires patience, but watching it transform into a glorious amber color is worth every second.
- Once it reaches that perfect shade, carefully add butter, stirring until melted. Gradually pour in heavy cream and continue stirring. Stand back; it will bubble and steam! Lastly, add salt and vanilla extract, and let it simmer for a few minutes until it thickens.
Let the caramel cool slightly before pouring it over the cooled shortbread layer. This will create the rich medley of flavor that makes Homemade Twix Bars truly special!
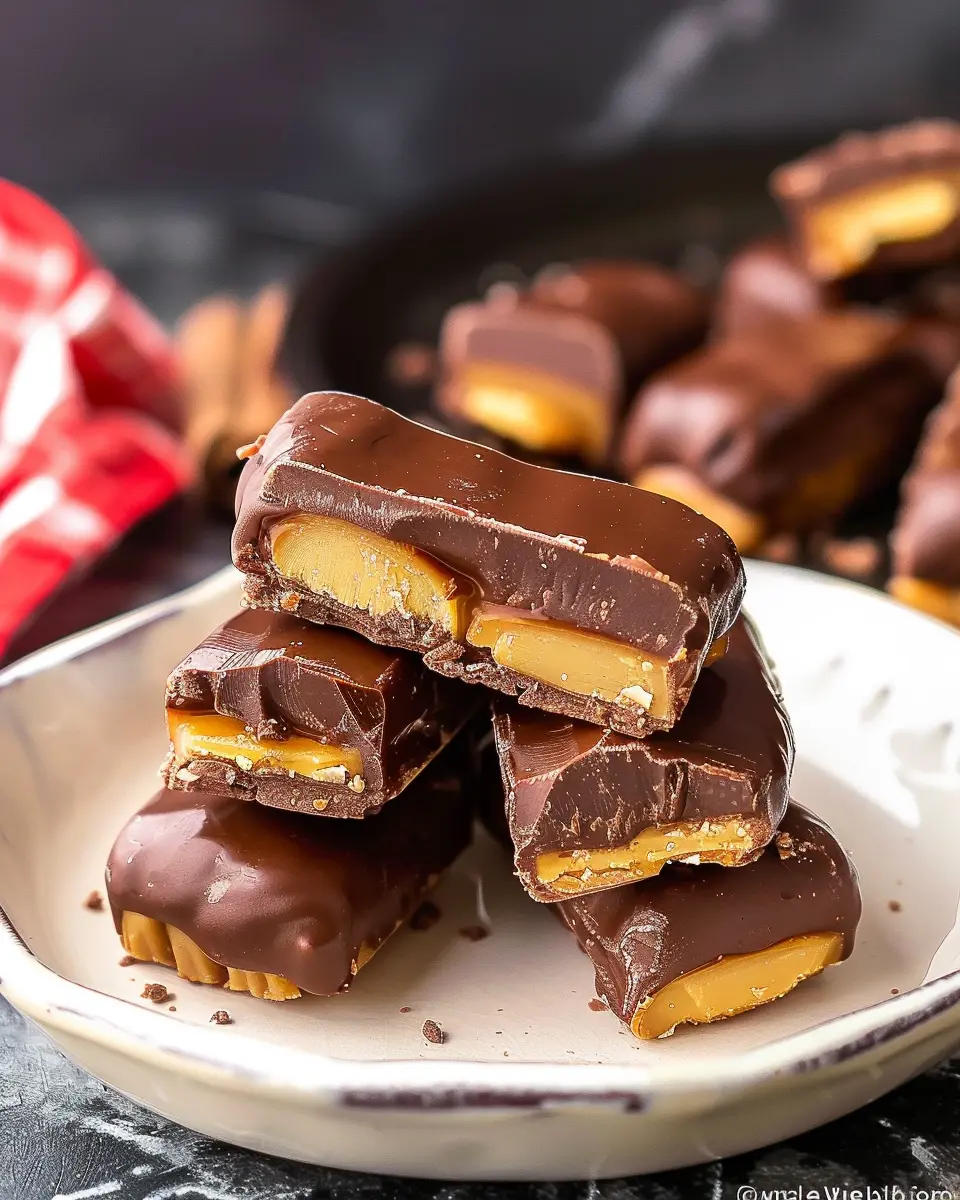
Assemble Your Bars with Care
Once your caramel is spread evenly over the shortbread, it’s time to let it set. Refrigerate the assembled bars for about 30 minutes. This chilling step will help the caramel firm up and make cutting easier later on.
When it’s time to cut, run a knife under hot water and dry it off for clean cuts. You’ll want to create bars that are easily manageable—aim for about 1 inch wide for the classic Twix look!
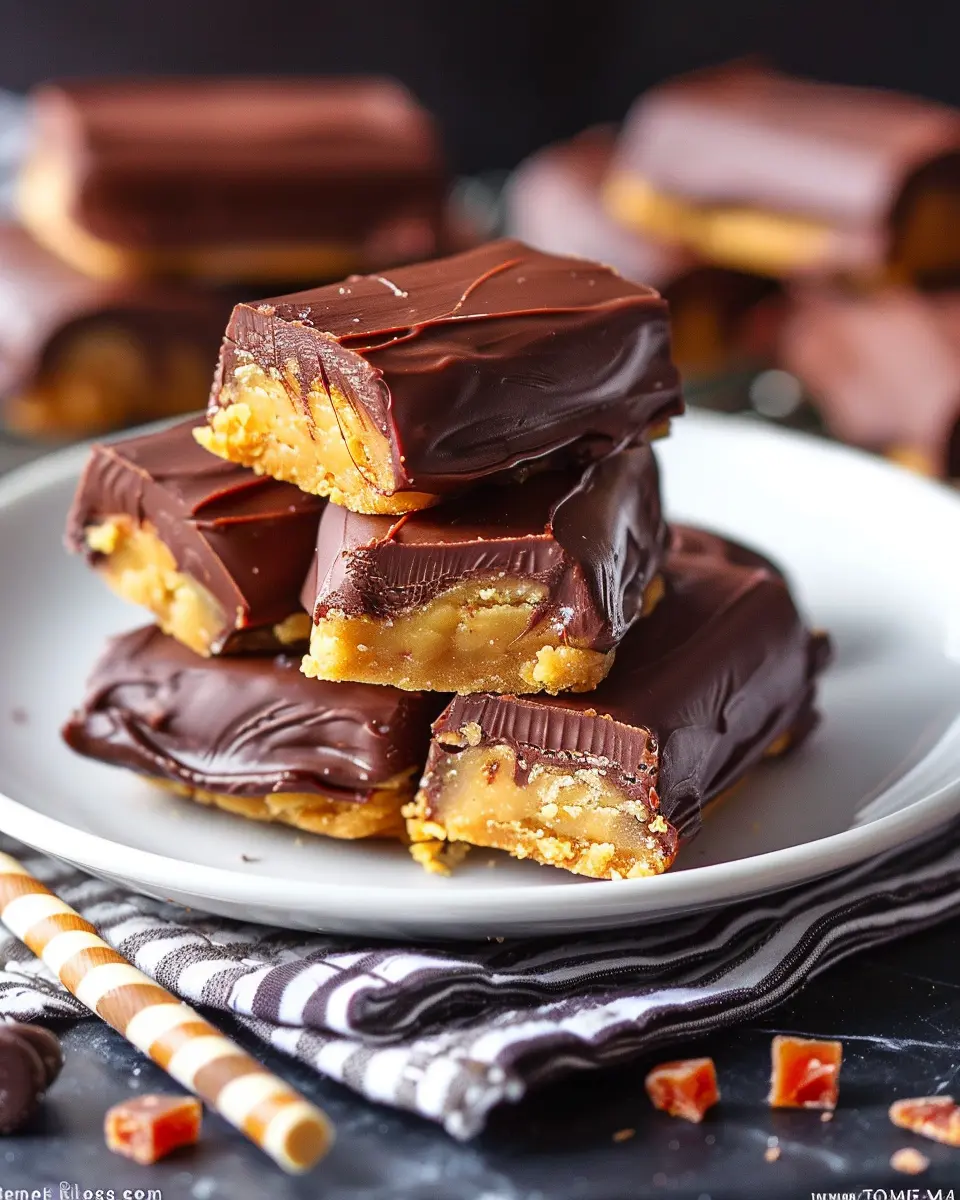
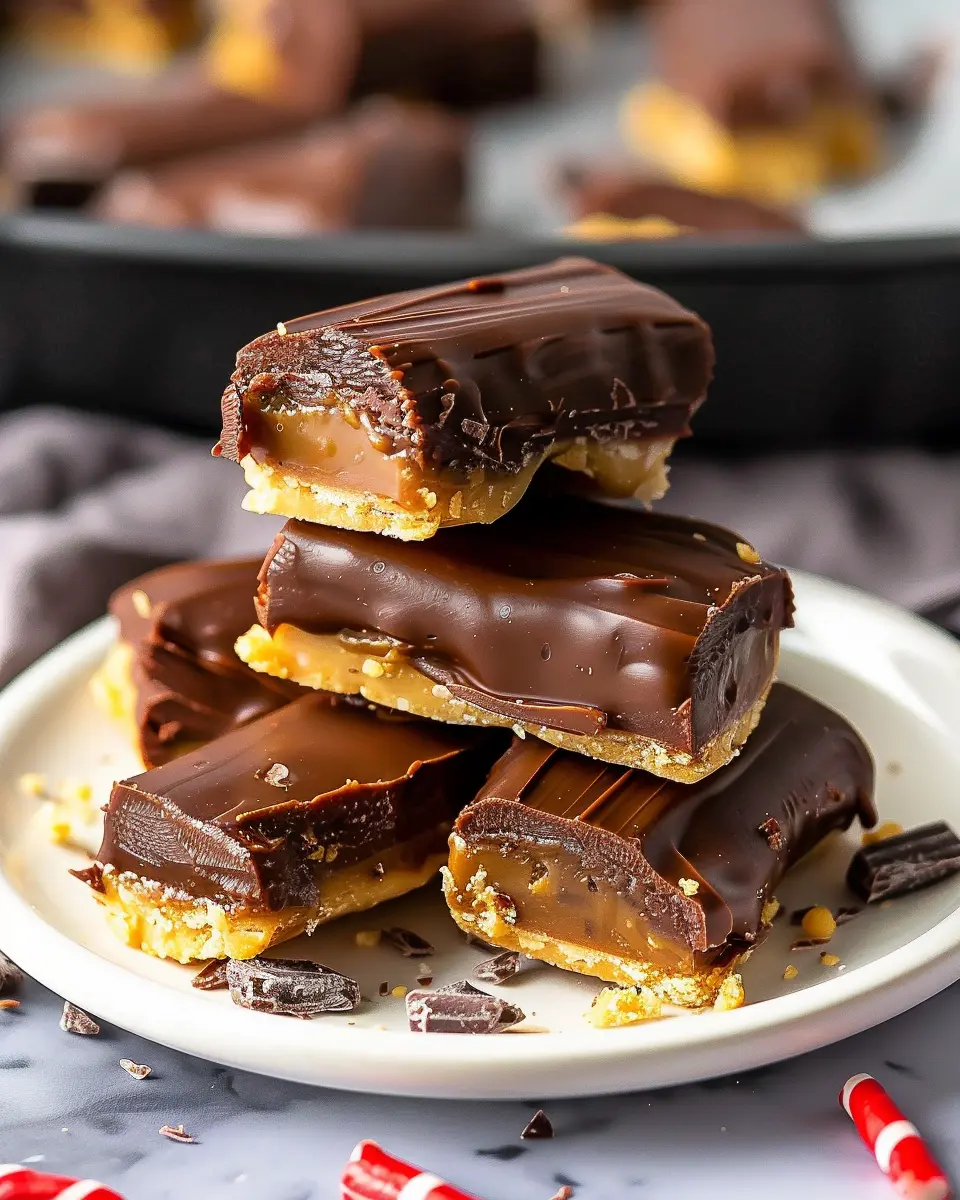
Coat Your Bars in Chocolate Perfection
To finish off your Homemade Twix Bars, melt your chocolate in a microwave-safe bowl, stirring every 30 seconds until smooth. If you want that irresistible shine, mix in some coconut oil.
Carefully dip each bar in the melted chocolate, ensuring every side is well-coated. Place them on a baking sheet lined with parchment paper. Once done, refrigerate them again for about 15 minutes until the chocolate sets.
Enjoy your homemade creations with a cup of coffee or share them with friends for a sweet surprise! For more fun dessert recipes, check out this fantastic dessert ideas blog to keep your sweet tooth satisfied!
Now you have your very own Homemade Twix Bars, and I’d love to hear how yours turn out! Who knew it could be this easy to recreate a store-bought favorite?
Variations on Homemade Twix Bars
Classic Chocolate Twix with a Twist
While the traditional Homemade Twix Bars recipe is always a hit, adding a personal touch can make them even more special. Consider infusing your chocolate layer with flavors like sea salt, espresso, or even a hint of orange zest. Salted caramel is another twist that elevates the taste, providing a delightful contrast to the sweetness of the chocolate and shortbread.
To create this classic with a twist, here’s what you might try:
- Salted caramel drizzle: Before the chocolate hardens, drizzle homemade salted caramel on top. The combo is sure to impress.
- Nutty crunch: Add chopped nuts to your shortbread for a delightful crunch. Almonds or hazelnuts work wonderfully.
Vegan-Friendly Homemade Twix Bars
If you or someone you know follows a vegan lifestyle, you can still enjoy the indulgence of Homemade Twix Bars. The good news is that plant-based alternatives can be just as delicious and satisfying!
For a vegan twist, replace the dairy ingredients with:
- Vegan butter or coconut oil for the shortbread.
- Maple syrup or agave nectar in place of regular caramel. This gives a rich sweetness without animal products.
- Dark chocolate chips that are dairy-free for the chocolate coating.
These substitutions don’t compromise flavor, and you’ll be surprised how quickly they disappear.
For more tips on vegan baking, check out resources like Forks Over Knives. As you explore these variations, don’t hesitate to get creative and experiment with different flavors. The kitchen is your canvas, and homemade treats like these can always use a personal touch!
Cooking Tips and Notes for Homemade Twix Bars
Achieving the perfect shortbread texture
When crafting your Homemade Twix Bars, the key to a delicious shortbread layer lies in the dough consistency. Aim for a crumbly yet cohesive texture that holds together when pressed.
- Use cold butter: This helps create that flaky texture. Let it sit for just a few minutes outside the fridge before mixing.
- Don’t overmix: Gentle folding will yield the best results. Once the flour is incorporated, stop mixing to keep it airy.
Tips for a smooth caramel layer
A luscious caramel layer is the heart of your Homemade Twix Bars. Here are some essential tips:
- Heat evenly: Use a heavy-bottomed saucepan for uniform heat distribution. Stir constantly to prevent burning.
- Watch the temperature: A candy thermometer is your best friend here. Aim for a temperature of around 240°F (115°C) for a perfect, gooey texture.
With these insights, your Homemade Twix Bars will be a delightful treat that won’t last long! For more in-depth guidance, check out resources like the Food Network or Serious Eats, both full of kitchen wisdom and inspiring recipes.
Serving Suggestions for Homemade Twix Bars
Perfect pairings for your homemade treats
If you’ve just whipped up a batch of Homemade Twix Bars, you’re probably looking for ways to enhance your enjoyment. These decadent bars pair beautifully with a variety of treats and drinks. Here are a few ideas:
- Nutty coffee: A rich, nut-flavored coffee complements the caramel perfectly. Try a hazelnut or almond brew for an extra kick.
- Herbal tea: A calming chamomile or mint tea can balance the sweetness, making for a delightful afternoon snack.
- Fresh fruit: Pair your bars with slices of crisp apple or juicy strawberries to add a refreshing contrast to the rich chocolate and caramel.
Creative presentation ideas for sharing
Impress your friends and family by showcasing your Homemade Twix Bars in deliciously appealing ways:
- Layered display: Arrange your bars on a tiered cake stand for an elegant look at your next gathering.
- Gift boxes: Package them in cute, decorated boxes tied with a ribbon—perfect for gifts or party favors!
- Themed plates: Use seasonal plates; a festive touch can make your treats a centerpiece at your gatherings.
These tips will not only elevate your dessert game but will also encourage everyone to savor the experience. For more ideas on presenting sweets, explore this resource for inspiration!
Time Breakdown for Homemade Twix Bars
Preparation Time
The preparation time for your Homemade Twix Bars is about 30 minutes. This includes gathering your ingredients and assembling the layers of your delightful treat. Make sure to have everything you need on hand to keep the process smooth and enjoyable!
Cooking Time
The cooking time is roughly 45 minutes. This is the time you’ll spend baking the shortbread and allowing your caramel layer to set. Patience pays off here, so be sure to give yourself a little breathing room!
Total Time
In total, you’re looking at approximately 1 hour and 15 minutes from start to finish. While it may seem like a bit of a commitment, think of the delicious rewards! You’ll not only impress your friends and family but also enjoy a homemade dessert that beats any store-bought option. For more insight into cooking times, check out this informative resource. Remember, good things come to those who wait!
Nutritional Facts for Homemade Twix Bars
Caloric Content
When you whip up a batch of homemade Twix bars, you’re treating yourself to a delightful indulgence, but it’s good to know what you’re munching on! Each bar roughly contains around 200 calories, making it a sweet treat that’s still reasonable if enjoyed in moderation.
Key Nutrients
These delicious bars also pack in some beneficial nutrients:
- Carbohydrates: Fuel for your day, mainly from the cookie and caramel.
- Fats: Provides a satisfying richness, thanks to the buttery layers and chocolate coating.
- Protein: A small amount from the ingredients, enhancing your snack’s nutrition.
Homemade treats often have the added benefit of fewer artificial ingredients. For deeper nutritional insights, consider checking resources at Healthline or NutritionData to compare with store-bought options! Enjoy your cooking adventure!
FAQs about Homemade Twix Bars
When whipping up a batch of homemade Twix bars, you might have a flurry of questions. Here, we’re answering some common queries to help guide your candy-making adventure!
How long do homemade Twix bars last?
Once you’ve created your delicious homemade Twix bars, they’ll typically last up to two weeks when stored in an airtight container at room temperature. If you’re anything like most candy lovers, they may not stick around that long! For optimal freshness, keep them in a cool, dry place—just away from direct sunlight.
Can I freeze homemade Twix bars?
Absolutely! Freezing is a great way to extend the life of your homemade Twix bars. They can be frozen for up to three months. For the best results, wrap each bar in plastic wrap and then place them in a sealable freezer bag. This extra step helps prevent freezer burn and keeps every layer tasting fresh upon defrosting. When you’re ready to enjoy them, simply let them sit at room temperature for an hour or two before indulging.
What’s the secret to a creamy caramel layer?
To achieve that perfectly creamy caramel in your homemade Twix bars, the key is to cook the sugar and butter slowly over medium heat. Stir consistently to prevent burning. For a fool-proof method, consider using a candy thermometer to ensure the mixture reaches the soft-ball stage (around 235°F to 240°F). Adding a pinch of salt can also enhance the flavor, balancing the sweetness.
If you’re interested in more tips and tricks, check out this caramel-making guide for additional insights. Happy candy-making!
Conclusion on Homemade Twix Bars
Why you’ll never want store-bought again
Making Homemade Twix Bars is not just a treat; it’s a gratifying experience. These bars, with their rich chocolate coating, buttery shortbread, and sweet caramel, allow you to indulge without the preservatives often found in store-bought versions. Plus, the customization options are endless! You can tweak the sweetness or try different nuts for a unique touch.
Once you’ve tasted the freshness of your own creation, you’ll realize that store-bought treats pale in comparison. So, gather your ingredients and treat yourself to a satisfying culinary adventure that will elevate your dessert game! For more delicious recipes and insights, check out Serious Eats for kitchen tips.
PrintHomemade Twix Bars: The Easy Indulgence You Can Make Today

Indulge in the deliciousness of homemade Twix bars with this easy recipe that combines a buttery cookie, creamy caramel, and rich chocolate.
- Prep Time: 20 minutes
- Cook Time: 15 minutes
- Total Time: 35 minutes
- Yield: 12 bars 1x
- Category: Dessert
- Method: Baking
- Cuisine: American
- Diet: Vegetarian
Ingredients
- 1 cup all-purpose flour
- 1/2 cup unsalted butter, softened
- 1/4 cup powdered sugar
- 1/2 cup sweetened condensed milk
- 1 cup chocolate chips
- 1/4 cup corn syrup
Instructions
- Preheat your oven to 350°F (175°C).
- In a mixing bowl, combine the flour, softened butter, and powdered sugar to form a dough.
- Press the dough into a greased baking pan and bake for 15 minutes.
- In a saucepan, heat the sweetened condensed milk, corn syrup, and chocolate chips together until melted and smooth.
- Spread the caramel mixture over the baked crust and refrigerate until set.
- Once set, cut into bars and enjoy!
Notes
- For a richer flavor, consider adding a pinch of sea salt on top of the chocolate after melting.
Nutrition
- Serving Size: 1 bar
- Calories: 250
- Sugar: 18g
- Sodium: 100mg
- Fat: 15g
- Saturated Fat: 9g
- Unsaturated Fat: 5g
- Trans Fat: 0g
- Carbohydrates: 30g
- Fiber: 1g
- Protein: 3g
- Cholesterol: 30mg
Keywords: Homemade Twix Bars